I’m here to provide a step-by-step for installing your own rain barrel using the Earth Minded Rain Barrel Kit. I purchased this kit while participating in a workshop hosted by our local Parks Department, but you can find it at several retailers.
This project was completed in less than two hours during toddler nap time, while the Wife was out shopping for yoga pants. So two hours is your time commitment. You can significantly shorten that if you don’t want to paint your barrel and stand around watching it dry. But enough talk. Let’s get to building so you can end up with one of these!
Materials & Tools Needed
- EarthMinded Rain Barrel Kit
- Food Grade Barrel
- Krylon Spray Paint for Plastics (optional)
- Shovel
- Level
- Cinder Blocks (optional)
- Drill
- Safety gloves and goggles
Installation
It’s very important you begin with a Food Grade Barrel. Sometimes you’ll get lucky and can scrounge these from grocery stores, restaurants, or even car washes for free. The latter gets their soap delivered that way and if you think about it, well rinsed soap barrels are about as clean as you can get. If shelling out a few Washingtons, Craigslist always seems to have a few in our area.
There are many styles of barrel, but I prefer the closed lid variety as it basically eliminates any chance for mosquitoes. If you have an open lid type, some fine mesh, like used in window screens, will easily prevent that potential problem. Another option is to fork out a few dimes at your local pet store and bring home the cheapest goldfish they offer.
Here’s my old Food Grade gal that is rinsed and needs a little prettying up.

I began with a dousing of brown spray paint since that would:
- Block sunlight coming into this white translucent barrel, discouraging algae growth.
- Help it blend into our house’s trim a little more, making the Wife happy.


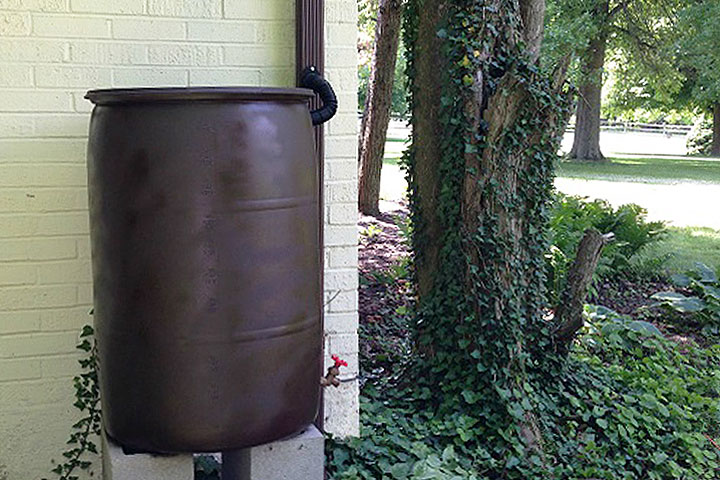
There. That’s better. While waiting for the paint to dry, I prepared my barrel’s future home next to a downspout. Use your shovel and level to excavate a flat, stable surface. If the movie Jerry Maguire taught us anything in the mid-90′s, it’s that a human head is apparently similar in weight to a gallon of water – about eight pounds. Fifty-five times that eight pounds is a lot. You don’t want this thing tipping over and rolling away.
I dug a little bit to rearrange some dirt in my spot and checked with a level. I then stacked a few cinder blocks to give the barrel some height. This does two things:
- The spigot can now be installed at the bottom of the barrel, so there’s room to fit a watering can or five gallon bucket underneath. I
- t increases water pressure in case I want to hook up a hose.

It’s finally time to break open the rain barrel kit. Use the (included!) hole saw bit to drill for the spigot. You want this up a couple of inches from the bottom so any debris will collect there and not clog up the works.

Hopefully you see something like this.

Insert the threaded rubber grommet.

Carefully screw in the spigot.

Next, we connect it to the downspout.
Select a spot on the barrel a couple inches lower than the lid, drill (with the included medium sized saw bit), and insert the non-threaded rubber grommet… making sure the kit’s flexible hose will reach from the front of the downspout.

Drill the downspout hole (with the included largest saw bit). The edges will likely be very sharp, so gloves and eye protection are good ideas.
It’s also really important to plan, then measure twice and cut once here. You need your downspout hole to be at lid-height of your barrel. If you have a closed lid type, like I do, then a little higher is better since it’s impossible for the barrel to overflow. If you have your downspout hole too low, water won’t flow up the connector hose into your barrel. I guess gravity doesn’t work that way.


Now here is the EarthMinded Kit’s claim to fame. This is the part you insert into the downspout.
It is designed so large debris like leaves and other stuff passes through the middle hole, continues on down the downspout, and exits. The clean rain water hugs the sides of the downspout, especially in lighter rains, gets collected by the tray around the hole, and diverted into the connecter (the part I’m holding), into the hose, and into your barrel.

Another look? Here it is oriented as it would sit in the downspout.

Pretty nifty. This was the only reason I purchased this kit, as I wanted to see for myself if the design would function as intended.
Stick that baby in the downspout. Attach with two self-tapping screws (also included in the kit), and connect the flexible hose. Obviously the hose feeds rain water into the barrel. When the barrel is full, the hose fills up, meaning no more water can get in and rainfall continues on merrily down the downspout.

Then sit back and declare this nap time project complete.
Here’s our rain barrel waiting patiently for Mother Nature to unleash her wrath so we can later water the large perennial bed in front of our house, and my fledgling food forest I’m planting in the acre of grass on this side of the house.


Leave a Reply