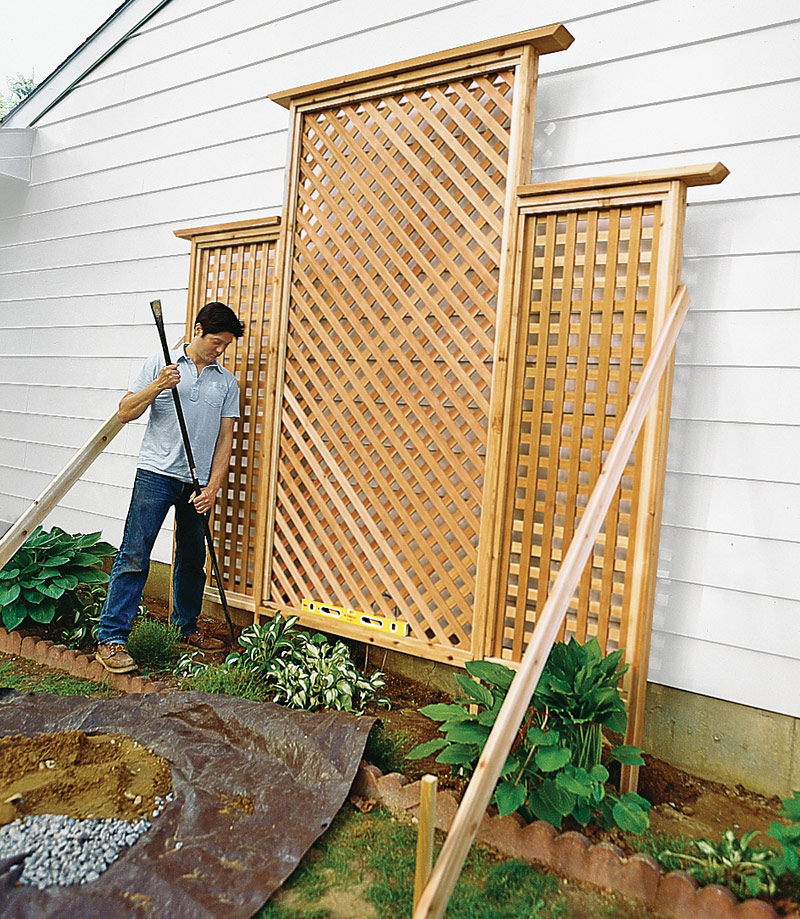
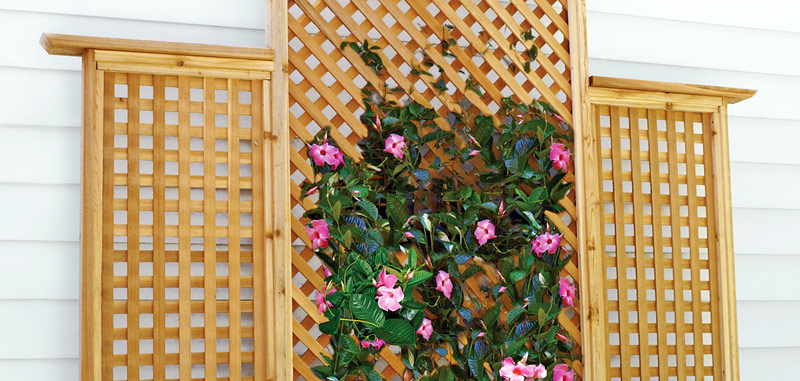
A wall covered with climbing vines may benefit the fairy-tale suitor who scales it to reach his true love, but in the real world the twisting tendrils will wreak havoc on your house’s siding. Better that you create a buffer between the foliage and the facade with a garden trellis. Not only will it provide the plants with a more appropriate host, but it will also give you something better than a blank wall to look at when summer’s greenery fades. Here’s how to turn lattice fencing and 2x4s into such a three-panel focal point. Put it in place, and invite your garden to new heights. Just don’t extend the invitation to any Prince Charmings.
Tools for Building a Trellis
- Circular saw
- Speed Square
- Straightedge
- Combination square
- Chisel
- Handsaw
- Drill/Driver
- 2-foot level
- Posthole digger
- Digging bar
- Shovel
- Small hand tamper
Shopping List
- Cedar or pressure-treated 2x4s for the frame. Keep in mind that two adjoining trellis panels will share one vertical frame piece.
- Cedar or pressure-treated 1x1s for the stops that hold the lattice
- Cedar or pressure-treated lattice fencing comes in 4-by-8-foot sheets. If you’re building more than one panel, get both straight and diagonal lattice.
- Cedar or pressure-treated 2×6—to cap the tops of the panels.
- ¾-inch gravel for drainage in the postholes. Four 50-pound bags will be enough.
- 1 5/8-inch self-tapping deck screws
- 3-inch self-tapping deck screws
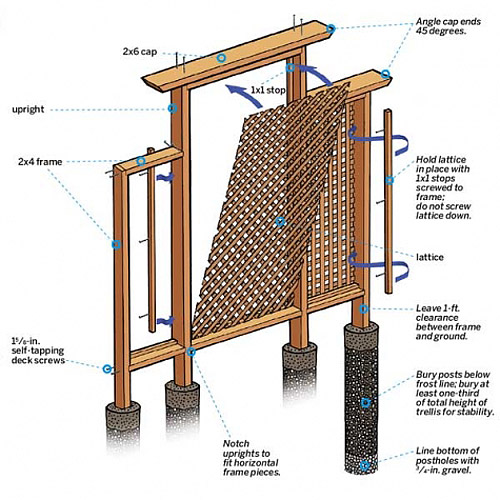
Size the Frames

Design your trellis in proportion to its surroundings, keeping distances from architectural features—such as the eaves or windows on the house—consistent. When sizing the frame’s uprights, remember that they double as the posts, so they must be long enough to be buried deeper than the frost line in your region and still leave a 1-foot clearance between the frame and the ground (for cleanup). For stability, you should also size them so that you’ll be burying one-third of the trellis’s total height.
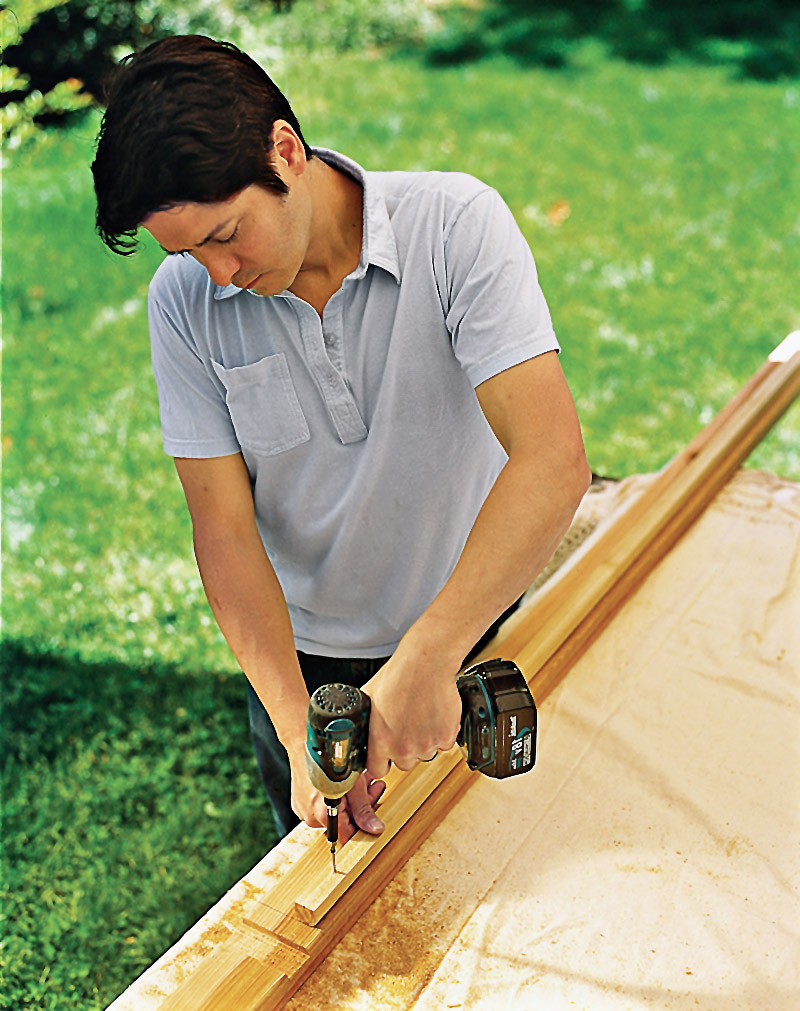
Using a circular saw guided by a Speed square, cut the 2x4s to the lengths needed for the uprights and the horizontal members of each frame. Using a circular saw guided by a straightedge, cut panels from the lattice that are sized to fit inside the frames.
Locate and Mark Notches
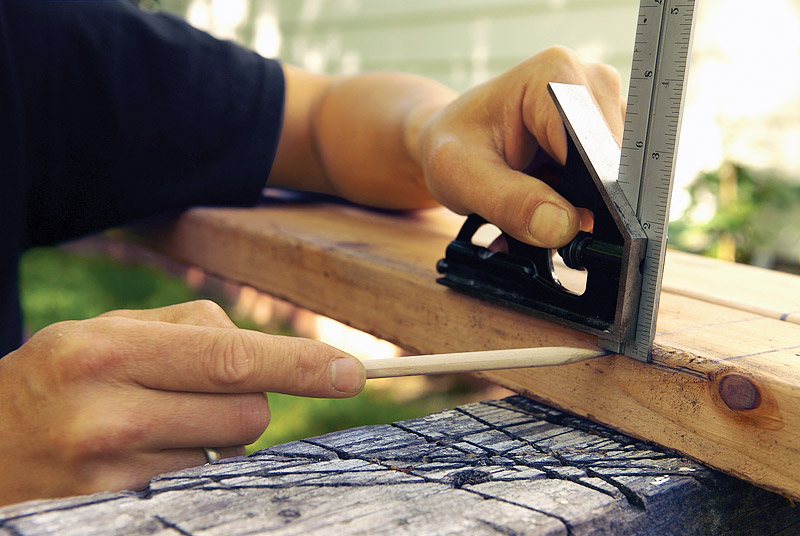
The horizontal 2x4s in the trellis frames meet the vertical pieces by butting into ¼-inch-deep notches. Joining the lumber using a combination of notches and screws will make for a very strong and square frame.
To locate the bottom notches, measure up from the end of the frame’s two uprights a distance of 1 foot, plus the amount the posts will be buried, and mark the wood. Lay both uprights flat, side by side, and flush at the ends. Lay a scrap 2×4 on edge—representing the width you want your notch to be—across the uprights at your mark, and, using a Speed square, check that the scrap is square to the lumber. Trace its width onto the uprights. Repeat this marking at the top edge of the uprights. Using a combination square, measure down ¼ inch along the sides of your markings to give you a guide for the depth of the notches. If your trellis will have two or more attached panels, you’ll need to notch both sides of the common uprights.
Tip: To be sure the two notches on either side of each frame are even, mark and cut them on both uprights at the same time, working with the lumber lined up side by side.
Make Kerf Cuts and Smooth Notches
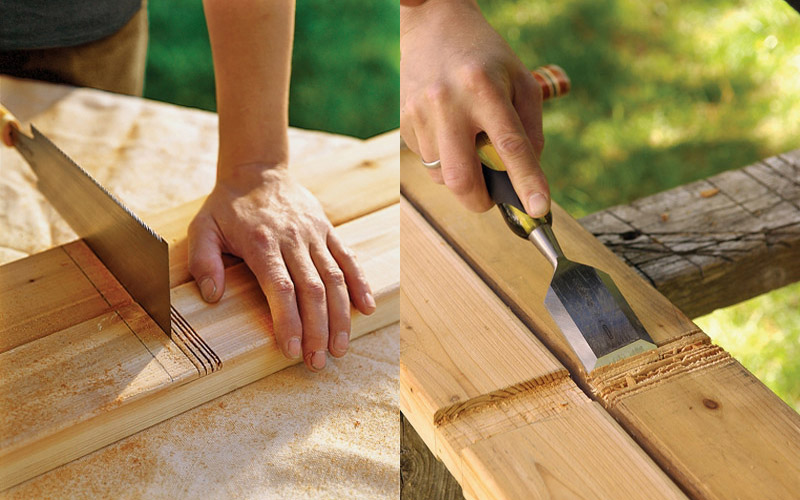
Using a handsaw or circular saw, make ¼-inch-deep kerf cuts, closely spaced together, between the marks.
Using a chisel, bevel side up, knock out the remaining wood between the kerfs. Then smooth the base of the notch. Check the fit of each notch with a 2×4; it should be snug but not too tight.
Assemble the Frame
The lattice panels that make up the climbing portion of the trellis float freely between two stops of 1x1s attached to the 2×4 frame. Because this sandwich of strip, lattice, and strip is thinner than the 2×4, it creates a stepped-down reveal between the frame and the lattice, which must be consistent all the way around when viewed from the front.
Using a circular saw, cut four 1×1 strips to fit between the uprights. To create the vertical stops, cut four strips to the length between the notches on the sides, minus 1½ inches. Set the stops on the 2x4s, positioning them ¾ inch away from the edge by holding a 1x scrap as a spacer (the true width of 1x material is ¾ inch). Using a drill/driver, screw the stops to the inside of the frame with 1 5/8-inch screws.
Pro Tip: Assemble larger trellises near the site so that you won’t have to transport the heavy piece too far.
Attach Horizontal Frame Pieces
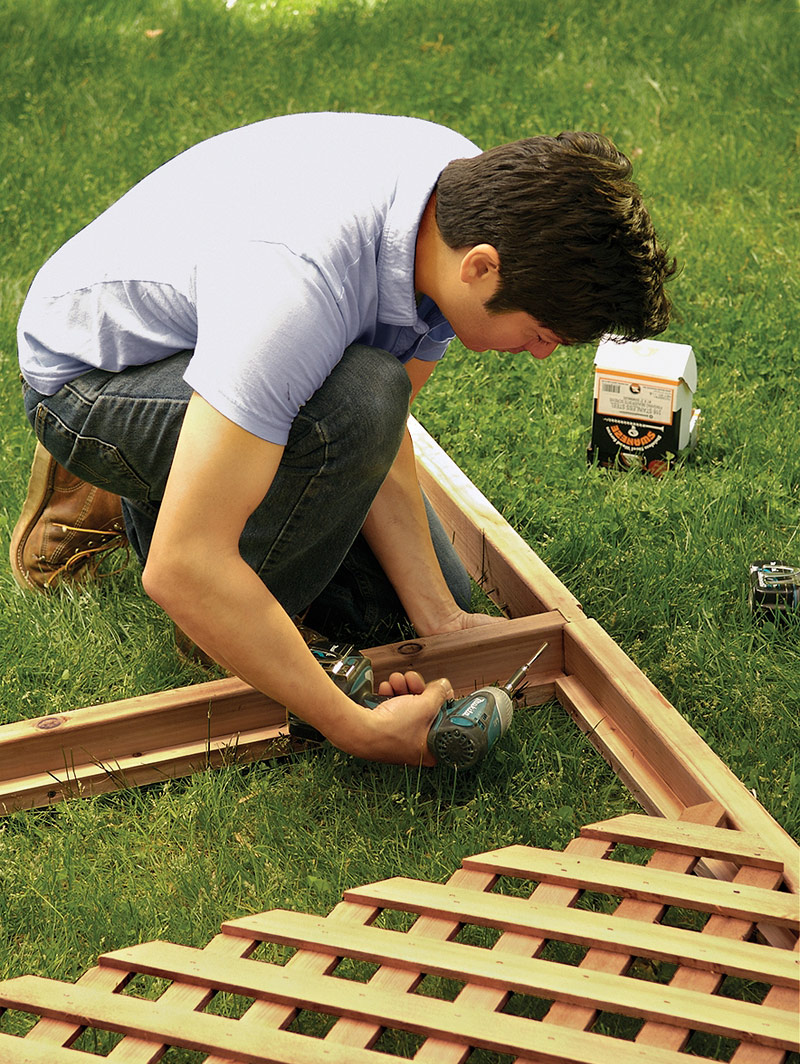
Set the horizontal frame pieces into the notches on either upright. Holding a Speed square at the corners where the frame meets, screw the 2x4s together using 3-inch screws. Screw straight into the top corners, but wherever the upright has back-to-back notches, angle the screws so that they don’t interfere with the other side.
Set the Lattice in Place and Attach Them to Frame
Because the lattice needs to float freely, it is not attached with fasteners to the frame; this allows it to expand and contract with the weather. For this reason, the lattice shouldn’t be too snug in the frame. Make sure it has room to move but still sits on the 1×1 stops.
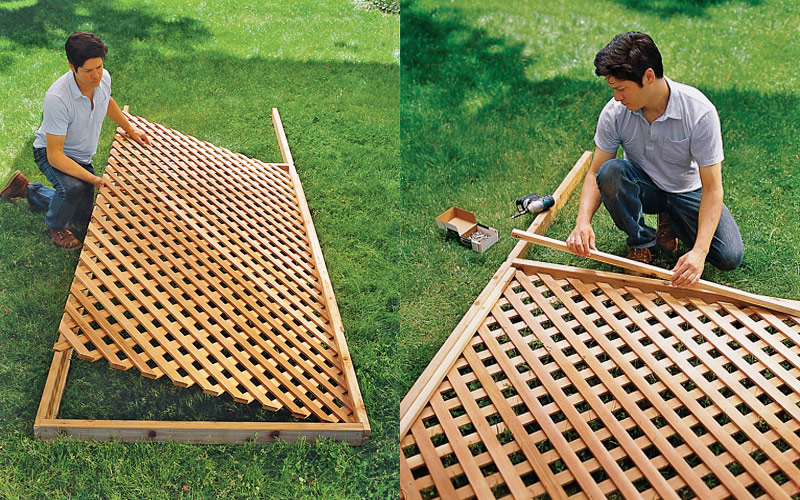
Lay the center frame on its face with the stops facing down. Lay the lattice inside the frame so that it’s resting on the stops.
Using a drill/driver and 1 5/8-inch screws, attach the back-side stops to the frame to hold the lattice in place.
Assemble and Attach Side Panel Frames and Lattice

Assemble a three-sided frame for each side panel, using the methods above. With the main panel facing down, fit the new frame into its notches in the upright. Using a drill/driver, screw the sides to the main panel with 3-inch deck screws. Screw at a 45-degree angle into the notches on the sides to hold the frame together. Lay the lattice in place, and secure the stops on the back side of the side panels to hold them in place.
Cut and Install the Caps
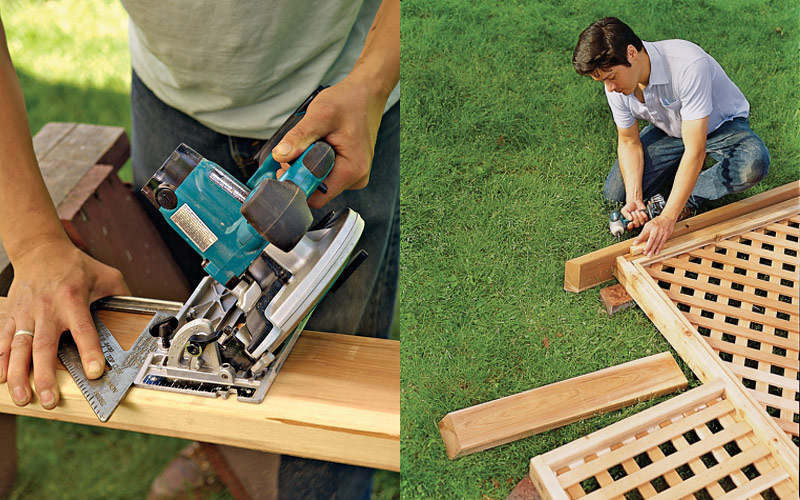
To give the trellis a finished profile, cap the panels with overhanging 2x6s that have angle cuts at the ends.
Using a circular saw with the blade set at a 45-degree angle, cut a 2×6 to the length of the center panel plus 10 inches. Cut 2x6s to the lengths of the side panels plus 5 inches, making an angled cut at one end of each piece but a straight cut at the other end.
Center the 2x6s over the top of each trellis panel. Using a drill/driver and 3-inch deck screws, attach the caps to the top of each frame.
Prep for Installation
To make sure that no climbing plants attach themselves to your siding, position the trellis 1 to 2 feet away from the house. This will also give you access to the back of the trellis for pruning and maintenance, and allow air to circulate to the plants.
Measure the distance between the centers of the uprights, and mark their locations on the ground. Using a posthole digger, make holes for the posts deep enough to clear the frost line. Pour 6 inches of ¾-inch gravel into the bottom of each hole for drainage. Tamp the gravel.
Tip: Use tape to mark the digger’s handles at the depth you want your holes to be so that you won’t have to keep stopping to measure.
Install the Trellis
Lay the trellis on its face, with the foot of the uprights adjacent to the holes in the ground. Tilt the trellis into place (get a friend to help with the lifting). Set a level on the bottom edge of the trellis, and add gravel where needed to bring it up to level; check it for plumb. Once you’re satisfied with the positioning, hold the trellis in place with 2x4s screwed to the sides as stabilizers. Fill the holes with soil mixed with some gravel, tamping it down every 6 inches. Fill the top few inches with soil. Remove the stabilizing 2x4s, and plant climbing vines and flowers as desired.
Source: thisoldhouse.com
Photos by : Kolin Smith
Wood Joinery – Through Dovetails
9 years ago

Paper Basket – DIY Ideas
7 years ago

DIY Vertical PVC Planter
8 years ago
Leave a Reply