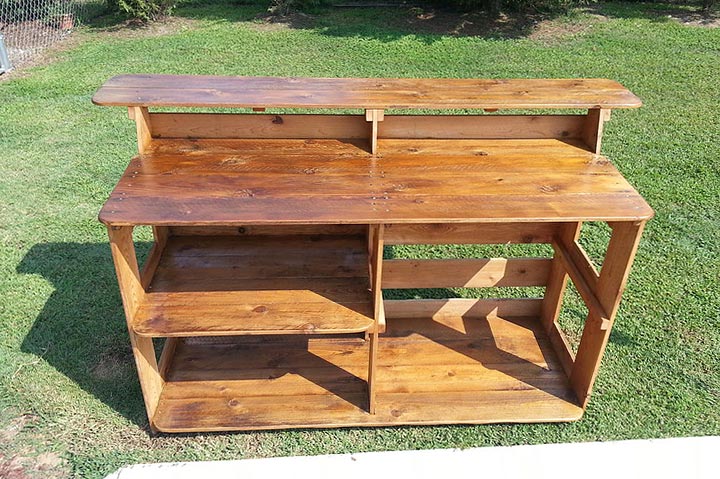
I love cooking and hanging with friends. I especially love grilling. So I finally decided to design and build an outdoor counter top for all my grilling prep work (someone makes me chop my onions outside)…oh…and I added a bar top as well. Best thing, since I used fence pickets we are talking less than $100. It can be made even cheaper if you use standard painted outdoor screws and don’t seal it. Without a sealer cedar will gray naturally and cedar is naturally weather resistant, but I wanted mine to maintain the original color of the wood. Hopefully the sealer I chose will last.
As you can see from the pictures and sketches I wanted this bar to be open and appear like a split-rail fence from the front. Mainly I chose this approach to give spiders fewer hiding places. Using less wood has caused one problem. If you are standing on the bar side and pull on the bar top it will tip forward since the base doesn’t weigh as much as most bars. I have come up with a few options to remedy this; weight of some sort on the bottom shelf or kickers between the legs and the ground beneath the bar top. Hopefully by the end of this “ible” I will have figured out a solution.
If you chose to take on this project remember you can make it your own. For instance you may rather completely enclose the fronts and sides with paneling, beadboard, or cover with bamboo. Make it your own.
Forewarning: I try to explain my instructables so anyone can build them… hopefully. But in doing so I can get long winded. If you are an experienced woodworker you can probably follow the cut list and sketches without the detailed explanations.
Tools for the job:
1) Saw (a miter saw is helpful but any saw can work… a jigsaw is good for rounding exposed corners)
2) Drill
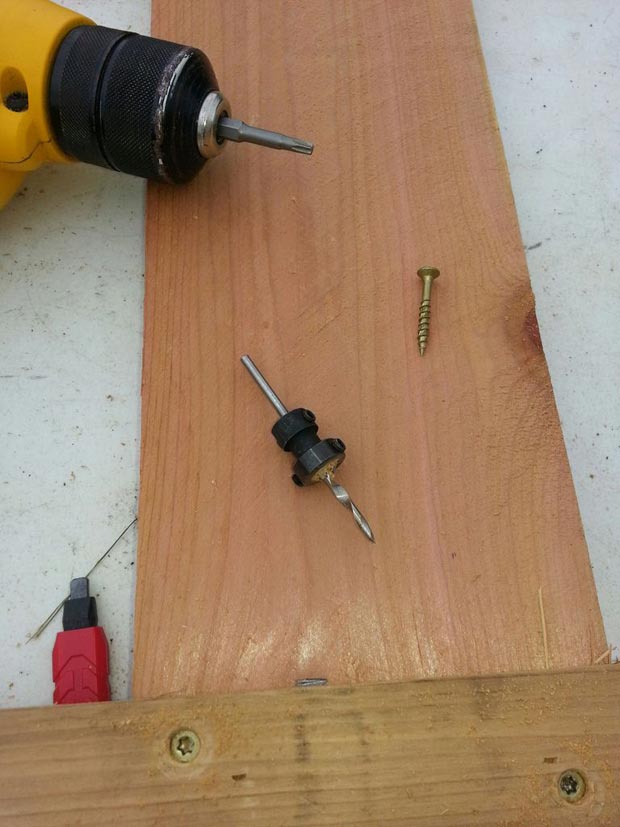
3) Counter sink bit
4) Air compressor and brad nailer (this is optional but EXTREMELY helpful in holding pieces together so you can go back and finish with screws without anything shifting)
5) Framing square
6) Sand paper and/or power sander (I like the random orbit sander)
7) Small clamps
Materials:
(18) 6 ft ..5/8″ x 5 1/2″ cedar fence pickets (cedar is untreated, safe, and resists rot and decay naturally). The biggest caveat of all fence pickets is they are rough cut lumber. You have to make sure every piece you pick out is straight and true and close to the same thickness and width as the last piece you added to your cart. You may need to spend some time picking out these 18 pieces, but they are roughly a third the cost of their finished, exact dimension siblings you will find inside the store. Plus I think their rough character works great for certain projects…like this one. You will actually need only 16 of them but its good to have spares to choose from in case something doesn’t line up correctly.
(4) 1 x 2 x 8ft cedar boards
(2 and a half) boxes of 75 count 1 1/4″ exterior screws. I used bronze coated ones with serrated threads and a star bit head. They help prevent splitting but I still pre-drill most holes
Sealer if you choose to seal your project
Cutlist
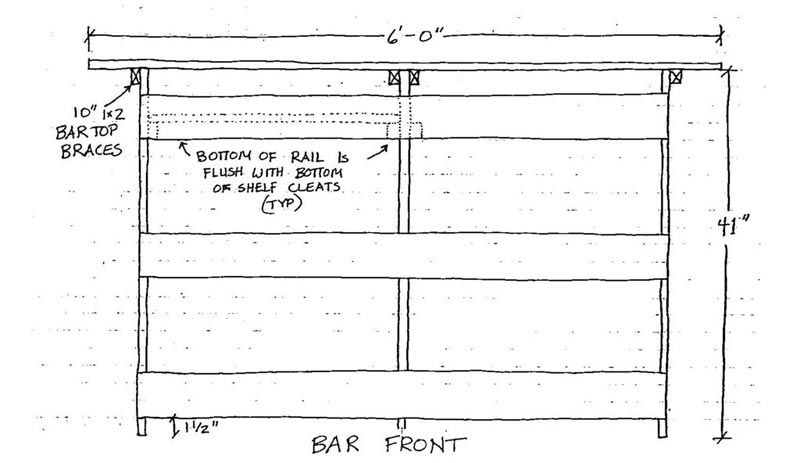
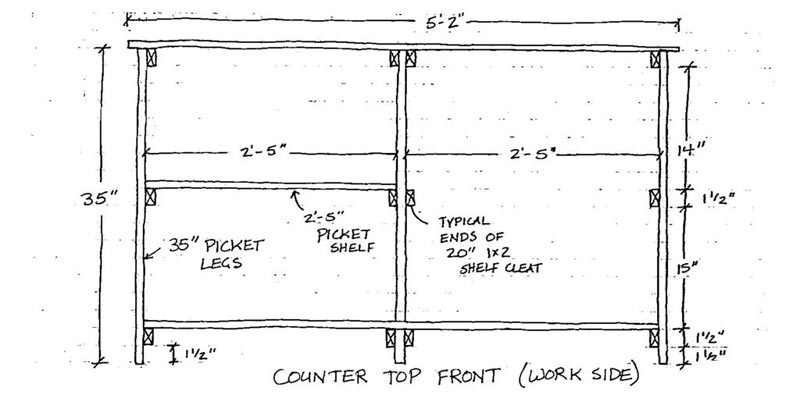
Wood Cutlist (by area)
Most projects I precut all pieces. But since these pickets vary slightly I would wait to cut after reading the step for all the long counter top, bar top, and shelf boards
All 6 legs should be cut so the dog eared end is on the ground when assembled
Counter top Legs :
(3) pickets 35″
Bar Legs
(3) pickets 41″ ( the angle on the top of the bar top legs is optional) If you decide to do it I went 2″ over on the top end and 5 1/2″ down to get my line. This step isn’t necessary but you gain 2″ of usable counter space without bar top above. And it helps the bar feel like it has the right amount of overhang without being obtrusive.
Shelf Cleats / Counter supports:
Ok now some lumber that stays true to its size ….a 1×2 bought from inside the store.
(12) 20″ 1 X 2 cedar
Counter Top:
(2) 2′ – 5″ pickets
(3) 5′ – 1″ pickets. These need to be as straight as possible… also make sure they are all as close to the same thickness as possible. This can be done by laying them across the counter top supports when you get to this step and put weight on all 3 at the point (above a support) where they touch and make sure the boards are even (not stepped) between each board. The 5′-1″ length is approximate; the easiest way to verify this length will be to assemble the legs first in the “spacing step” and measure what it would take for the 3 counter top boards to overhang 1″ on each end. OR at this point you may decide to have the counter top overhang the same amount as the bar top. In that case you would just cut the dog ear off 3 pickets and make sure all 3 are the exact same length.

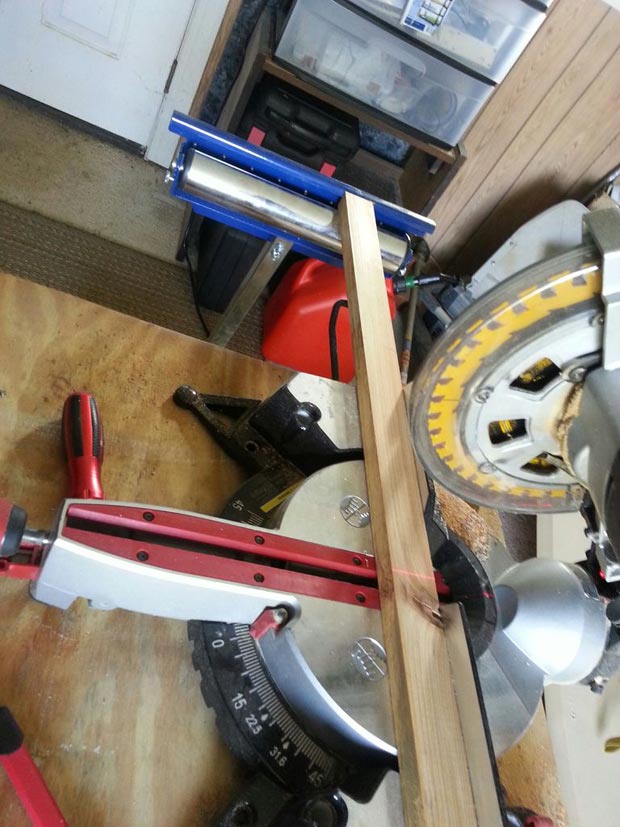
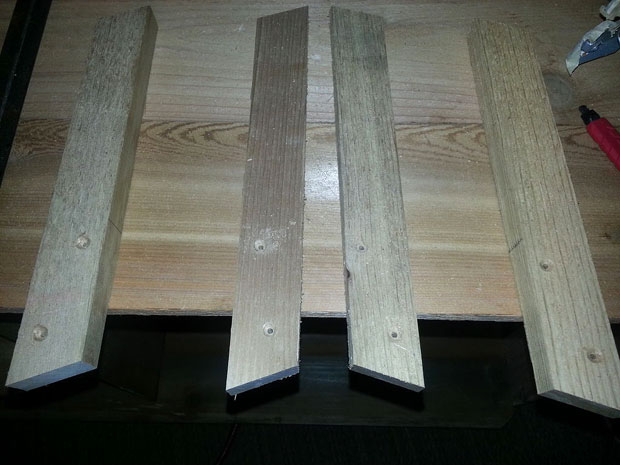
(2) 20″ 1×2 mending blocks with 45 degree bevel on each end
Middle shelf:
(4) 2′ – 5″ pickets (2 of these can be used as the temporary spacers when you get to that step)
(1) 20″ 1×2 mending block with 45 degree bevel on each end
Lower shelf:
(2) 2′ – 5″ pickets
(3) 4′ – 10 5/8″ pickets…2 will need to be coped around the middle leg… also the length of these 3 can be plus or minus, best to lay them across the bottom supports and mark to the outside of the 1x2s
(2) 20″ 1×2 mending blocks with 45 degree bevel on each end
Bar Top:
(2) pickets with the dog eared end cut off just enough to get to straight edge past the dog ear
(4) 10″ 1x2s supports with 20 ish degree bevel on each end
(2) 9 1/2″ 1×2 mending blocks
Build the 3 Legs
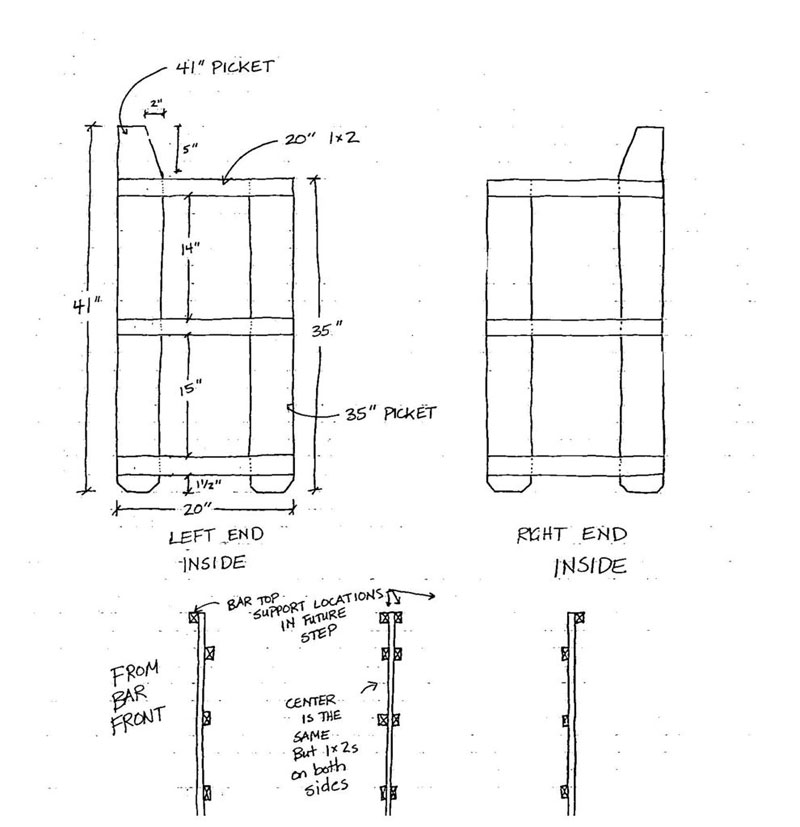
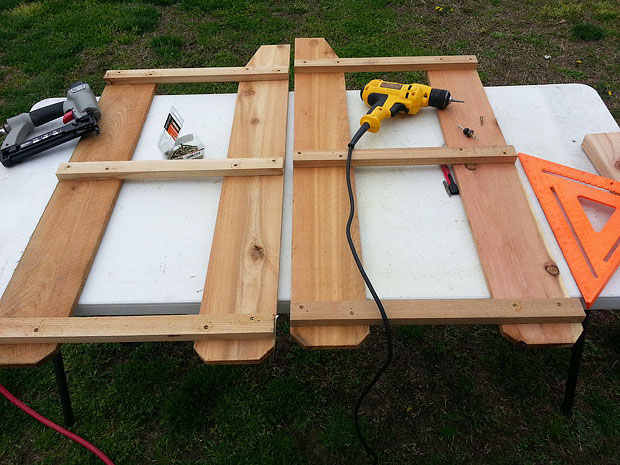
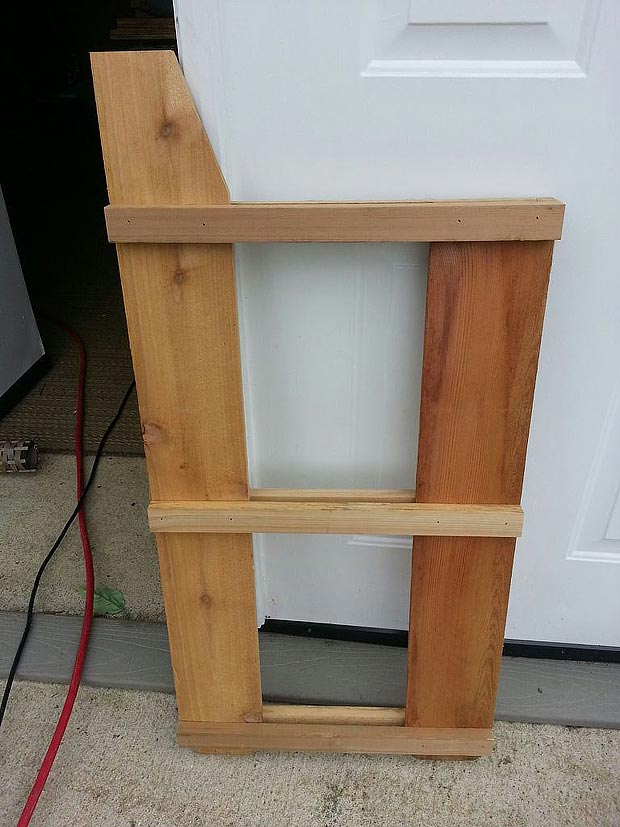
For the left end and the right end you need a counter leg, a bar leg, and 3 cleats / supports. For the center leg you need the last counter leg, bar leg and, 6 cleats.
Honestly this is the toughest part. Holding the legs even with the cleats and making sure everything is square when you attach it is the trick. This is why I decided to go with the brad nailer. Once you have a piece just like you want it the brad nailer gives you instant hold. You may then go back and install screws without getting frustrated with “walking screws”. For higher profile projects I would clamp and hold and etc etc….but for an outdoor bar there is nothing wrong with a few extra tiny brad head holes. So when I say “I attached” or “attach” I used brads to hold everything together until that piece was complete then I went back and installed the screws.
Throughout the following steps if I reference “the bar front” it is from the prospective as if you are standing on the bar side. And “the counter front” is from the prospective from standing on the counter side. Since I’m calling two different areas “front” I felt I should explain. Hopefully I won’t lose anyone.
ASIDE: All cleats / supports are installed with the wide side to the leg and the shelf or counter tops will sit on the narrower side of the cleats. So when the assembly is standing the cleat is tall.
I started by holding the first cleat even with the top (non-dog-eared end) of the counter leg and flush with the front of the counter leg so they create an upside down “L”. If your saw cuts are square and you are flush with the top and front before you attach, your cleat should be square also. But I always double check connections with a framing square just in case. Now add the bar leg by measuring / marking the top of the counter leg on the bar leg. This will line up with the top of the cleat when you attach it to the bar leg. Make sure its square and flush with the front of the bar leg. (see pictures and sketches)
How do we make sure the feet are level?: To help do this step I clamped a scrap straight 2×4 to the edge of the table. You can then pull the feet of your legs to the 2×4. Essentially this serves as a “floor” so you know you are attaching the cleats in a manor that will leave the feet at the correct even location to sit on the floor without wobbling.
Now repeat this for the bottom cleat. From the bottom of the legs I measured up 1 1/2″ to the bottom of the cleat. Attach square and flush with the fronts of the legs. If you are using your “floor” 2×4 clamped to the table you can space this using a small scrap 2×4 turned the narrow way so it is between the “floor” and the bottom of the cleat. Just make sure your leg’s feet are pulled all the way to the “floor” 2×4.
Finally I measured down 14″ from the bottom of the top cleat to locate the top of the middle cleat. Attach just like the other two.
Now repeat this process for the opposite end. This will need to be a mirror of the first end. Do not make them identical or the shelf cleats will be on the outside of one of the legs (see picture).
Finally make the middle leg but attach the cleats on both sides (see pics and sketches)
Whew… the hard part is over. Now go back and install all the screws if you haven’t already.
Lets Join the Legs (The Spacing Step)
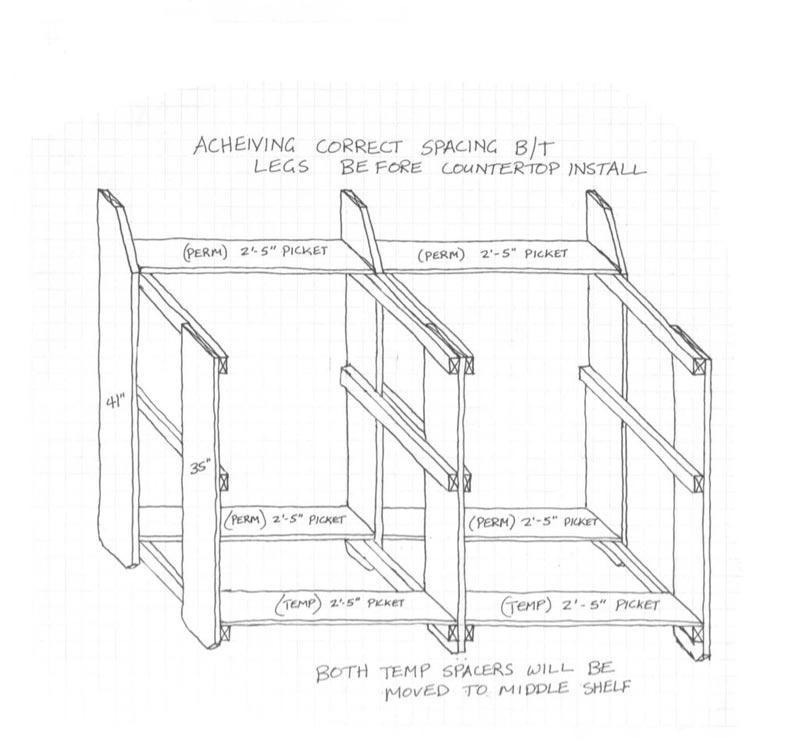
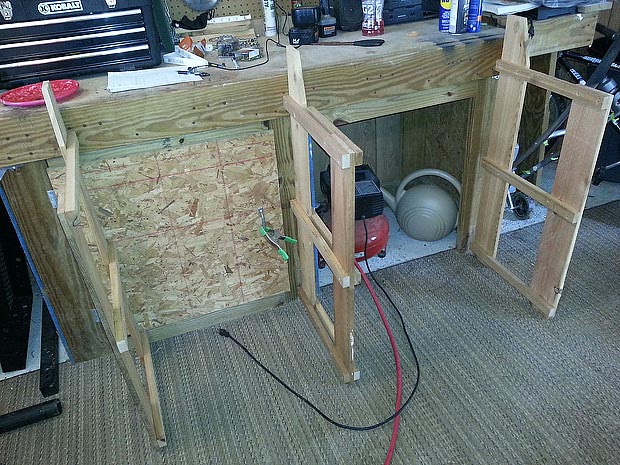
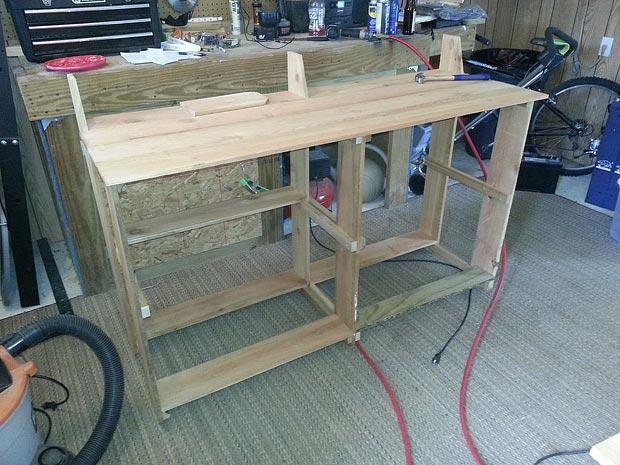
The easiest way to begin this step is to make sure you have all your 2′-5″ pickets cut. If you add them up from the cut list you should be cutting (8) pieces 2′ – 5″. You you will be able to get (6) of these from the remaining end of the pickets you cut the legs from. Make sure these are all the same length by using the first one you cut to compare to each newly cut piece. They should be exactly the same by holding them together and making sure each end is flush with your first piece.
Repeatable cuts: The easiest way to get repeatable cuts the same length is by using a miter saw and a stop block or a table saw with a crosscut sled. If you only have a jig saw or circular saw just measure twice and cut once :). It can be done, I’ve done many projects with nothing more than those two saws.
OK now we have our leg assemblies and our spacers / counter and shelf boards. As you can see 4 of these 2′ – 5″ boards are for the middle shelf, 2 are the back part of the counter between the bar legs, and 2 are for the same location on the bottom shelf. You can use the other middle shelf boards for now as temporary spacers at the front of the bottom shelf (this will be a full board with a notch cut out for the center leg but for now the spacers make sure everything is square)
I began by leaning the 3 leg assemblies against a workbench in the correct order (see pic). Now take one of the 2′ – 5″ boards and attach it to the top of the counter cleat on the left leg assembly, flush with the front of the bar leg and tight against it (The rails on the bar front will cover these cleats and the shelf so the front of the bar legs needs to be flush and smooth so the rail can touch all 3 bar legs with out intrusion from the cleats or shelf boards).
How to attach the boards: when you attach the boards to the cleats, the shelf board’s cut end will touch right up against the leg. The shelf board will be on top of the cleat, and your brad and screw will be installed from the top of the shelf board into the cleat.
Now attach the board in the same location on the cleat on the middle leg assembly. Repeat this to attach the middle leg and right leg together.
Now we have something that is starting to stand on its on. Repeat the same process for the boards between the bar legs on the bottom shelf cleats.
At this point you may be discovering these pickets do vary slightly in size. Its all good, its not supposed to be perfect thats the beauty of upcycling. Just make sure areas that need to be flush and square are so.
Finally use two of the remaining 2′ – 5″ boards as temporary spacers between the counter legs on the bottom shelf cleat. Make sure shelf boards and legs are butted together at all locations and put one brad in each end of the shelf board to hold everything square.
Lets get a counter top on ***bonus*** you can use it as a work bench for the rest of the project
Counter Top
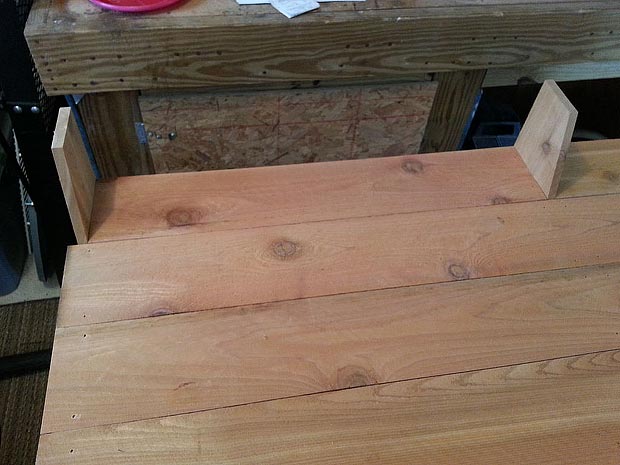
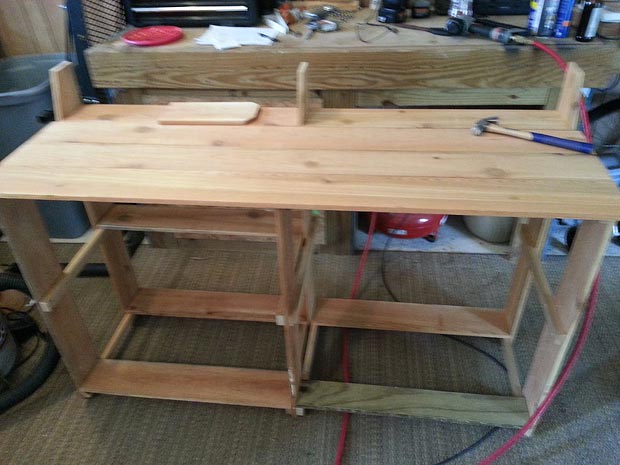
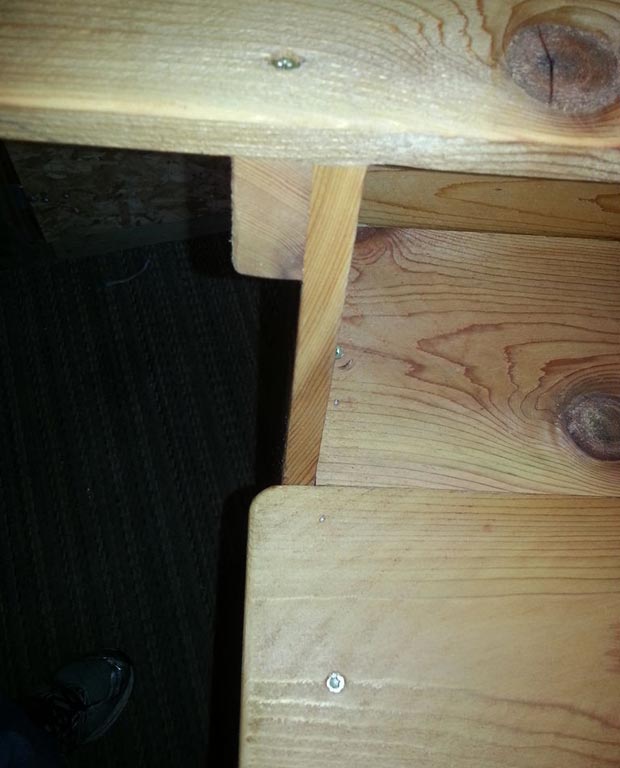
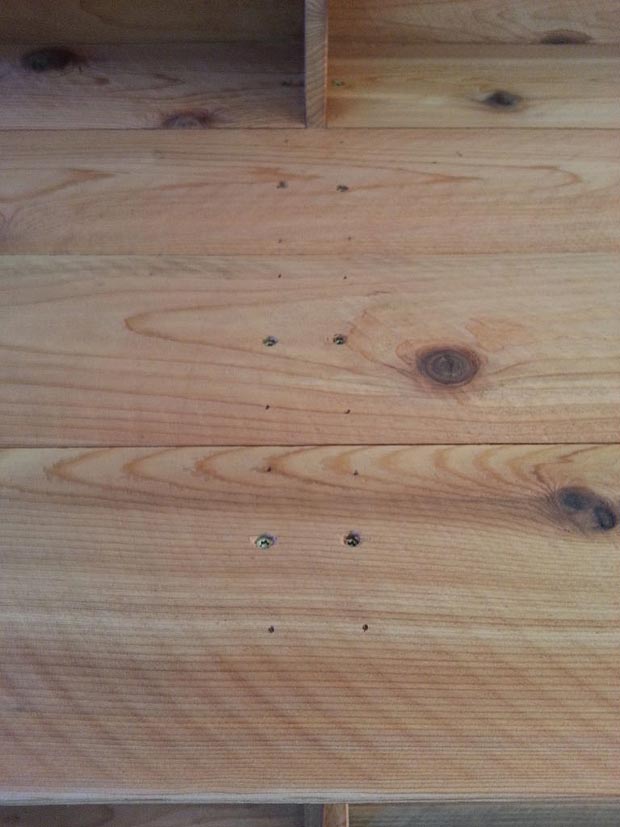
Now that the bar is standing on its own you should have 13 pickets left. Pick the 5 straightest pieces that are also as close as possible to the same thickness. 3 will be for the counter and 2 for the bar top.
Place one of the pickets on the counter supports so it overhangs both ends of the counter. Do you want your counter to be as long as this board or do you want it to just overhang the legs by an inch or so? Once you decide, measure what you would like and cut the 3 most similar boards the exact same length (remember the dog ear end should be the waste end).
Now take one of those boards and push it firmly against the previously installed 2′ – 5″ counter boards. There should be little to no gap the entire length of the counter between the boards. If there is a gap flip the board over and test again. If that isn’t satisfactory try one of the other boards you just cut. The goal is to leave as little of a gap as possible. Once you have settled on a board grab the next one and repeat the process leaving the first board loose on the counter and test the new board against that one. Then do the same with the third and final board.
Now that you have the boards in a satisfactory order its time to attach them.
You most likely will not be able to saw the back corners of the first full board round after you install it. Since I was only overhanging 1/2″ from the outsides of the leg I just sanded this corner round in the end (see picture). If you are overhanging more you may want to cut your round back corners before you install.
Even overhang: How to we ensure we are installing these boards in the center of the length of the counter top? By making sure the ends overhang equally. To do this measure from the outside of one end cleat to the outside of the other end cleat. Write your measurement down (should be roughly 4′ – 10 5/8″). Now measure the length of the boards you cut for the counter. Take that measurement and subtract the first measurement. How much is left? Take that and half it. now you know what the measurement from the outside of the end cleats to the end of the counter board. Check both ends and make sure the measurement is the same. Now we are good to go. You don’t have to make these measurements again, you just line up the ends of the next boards with the first board.
Now that we have an even overhang on each end start with the board closest to the bar legs pushing firmly against the previously installed 2′ – 5″ boards and attach. Repeat this for the next board keeping it firmly against the previous and even on the ends. Finally install the last board (NOTE: for this board the counter front of the board overhangs your supports 2″. So nails nor screws will serve a purpose within 2″ of the front of this board 🙂
For me since I used brads initially I just installed one screw per board per support (see pic). However I have since gone back and installed 3 per board per support because much to my surprise the counter top boards did start to cup. By installing an extra screw at the edge of each board at each support you fight the cupping. And a month later we have no new cupping so I think its working!
For a symmetrical appearance I installed screws down both supports in the middle which is overkill, structurally, but I think it looks good this way. You could alternate back and forth between them or just attach down one. Its up to you.
Now we have a workbench …. I mean counter top.
Lets Finish the Bottom Shelf
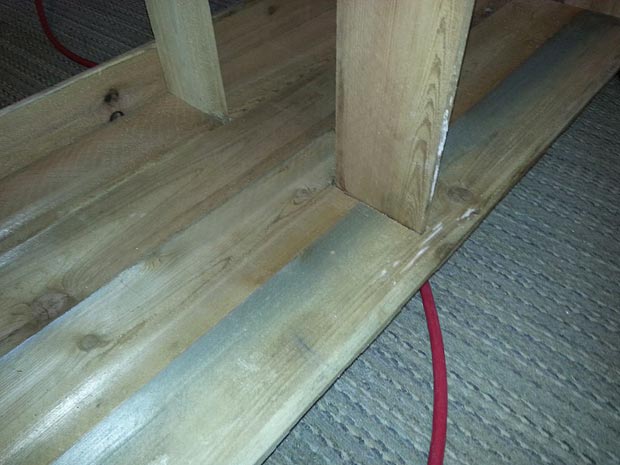
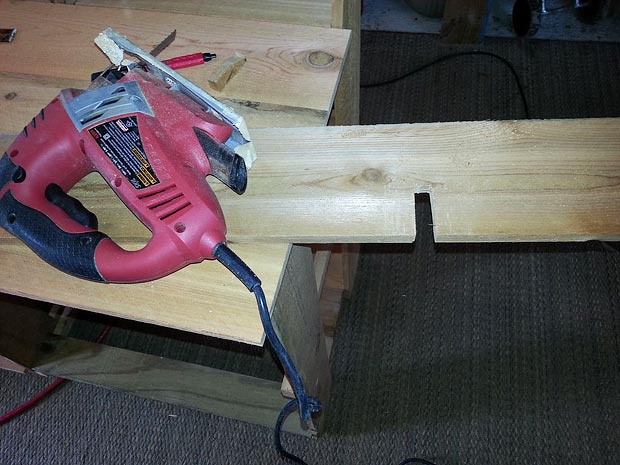
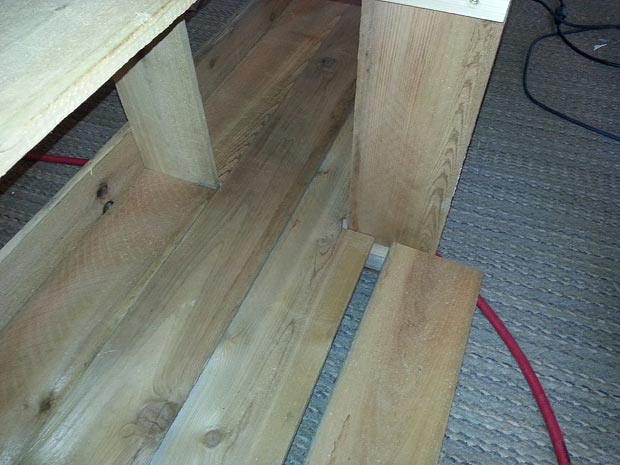
With your spacers still in place run a full picket through the legs to rest on the bottom shelf cleats. Push this picket tight against the 2′ – 5″ boards that are installed between the bar legs. Now position the picket so the square end is flush with the outside of the 1×2 cleat on one end. Now go to the other end and mark the location of the outside of this 1×2 cleat on the picket. The goal is for the bottom shelf boards to start on the outside of the bottom shelf cleat on one end and stop on the outside of the cleat on the other end.
Now that you have this mark cut this picket to that length, and 2 more just like it (remember to make cuts so you are removing the dog ear end).
Now take one of the boards and attach it flush with the outside of the cleats and tight against the previously installed 2′ – 5″ boards between the bar legs. Now that this board is attached you may remove the spacers across the front of the bottom shelf.
Time for the next bottom shelf board. Lay it on top of the board you just installed and slide it toward the counter front until it meets the back of the counter center leg. Make sure the ends of this board are even with the ends of the board you just installed and mark the location of the sides of the center counter leg on this shelf board. Now remove this loose shelf board and place it on your work bench. Now go back to the front edge of the previously installed board and measure the distance between the front of that board and the back edge of the center counter leg. Returning to your work bench measure that distance from the side opposite your marks for the sides of the counter leg. You should be able to mark the location of the counter leg on this board now using a square. (see pictures) Using a jig saw remove this rectangular piece from your shelf board. Go back to the bottom shelf and make sure it fits like it should: notch fits around center leg, board lays flat beside the last board you installed, and it sits inside the end counter legs on top of the end cleats. Everything good? If not make adjustments as necessary. If it fits good attach this board pushing it firmly against the last board you installed. Whew that was a lot of detail.
Now repeat this process for the front bottom shelf board. It will be easier to go the same route locating the center counter leg on this board by laying it on top of the boards you just installed and marking the sides of the leg on this final board. The only difference is this time you measure from the front edge of the last board you installed to the front edge of the counter leg. Now make that measurement (here is where it is different) from the SAME side of the new board the leg marks are on. Last time we pulled the measurement from the side opposite the leg marks. Draw your notch and cut it out. Now check this board the same as the last and install.
The only areas left are the middle shelf and the bar top.
Middle Shelf
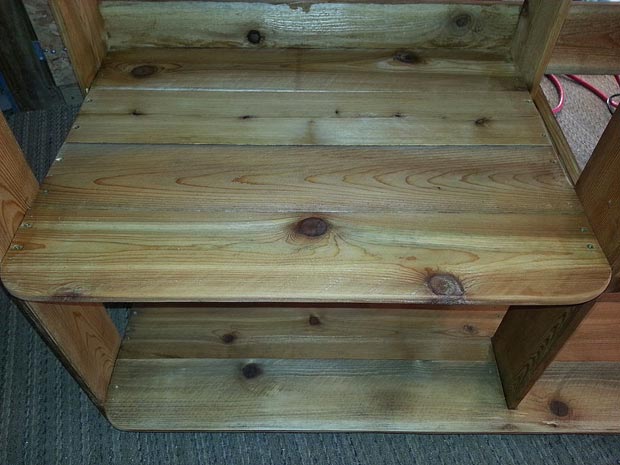
This is the easy part. You already have the first board installed. Now take your remaining (3) 2′ – 5″ boards (2 were used as spacers on the bottom shelf), and line them up along the middle shelf cleats. Get them like you want them and install them flush with the outsides of the 1×2 cleats. Remember to push the next board tight against the previously installed board.
Now that was an easy step! I’m thinking about adding a removable shelf on the right side. I mean the cleats are there and I have 2 left over pickets 🙂 For a removable shelf I would use (4) 2′ – 5″ picket boards and (2) mending blocks spaced at 10″. Oh yeah the mending blocks. That’s the next step.
What Are Mending Blocks?
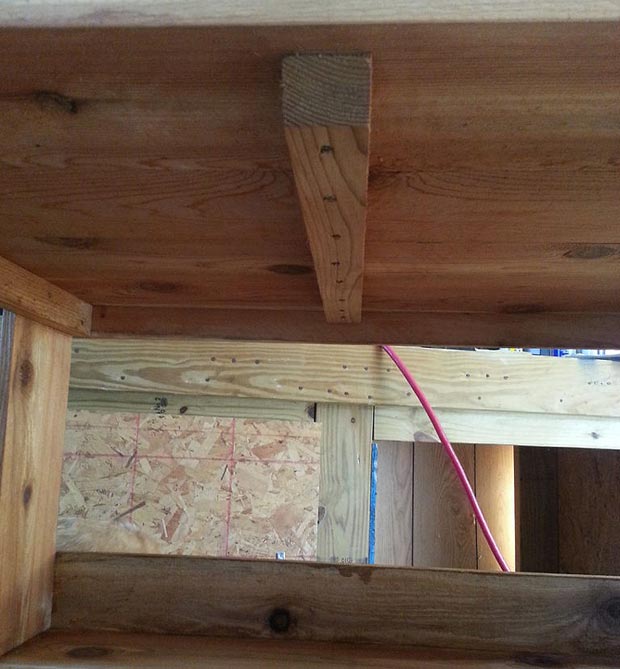
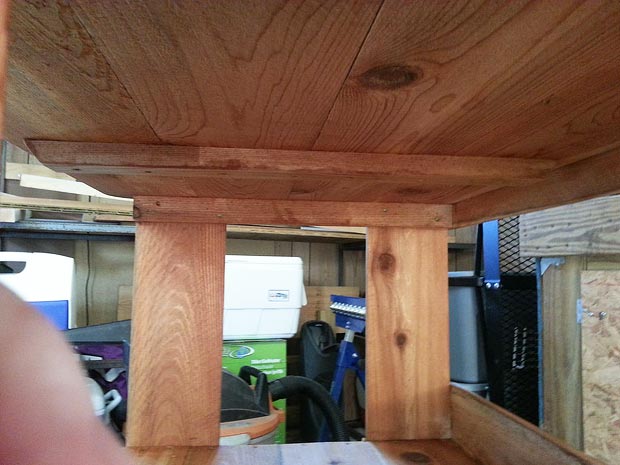
Well a mending block or mending plate serve the same purpose (one is wood and the other is a metal of some sort). Essentially it is a straight flat piece of material that goes across 2 or more pieces that are the same width. By attaching this plate or block you add rigidity to every piece it is attached to. If you test your counter or shelves right now and put weight on just one board halfway between the legs; a single board will deflect (bend downward…flex). However, once you install the mending block all the boards help to share the load, even if the weight is only placed on one board. Now with the same amount of weight on one board you should get little to no deflection due to the support from the adjacent boards.
Now that you have some info lets get to mending these shelves and the counter top. This is the point the (5) 20″ 1x2s will need to be cut. I cut the angle into each end to make the block more forgiving to hands passing in and out of shelf areas (see pictures). Plus the angle makes the profile smoother when you take a step back and admire your work.
So for these mending blocks the 45 degree angle is cut from the wide side to the wide side. You will see the angles opposing each other if you look at the narrow side. So the top (1 1/2″ side) should be 20″ long on one side and the bottom (the other 1 1/2″ side) should be roughly 18″ from end of angle area to end of angle area.
Ok now the easiest way to install these is to lay the bar on the counter front. Hold each mending block in the center between the legs and the same distance from the front of the bar and front of the counter (see pic). Now attach the blocks in each area. The 20″ long, wide side, is the side touching the underside of the shelf boards. So the mending blocks are oriented in the opposite direction from the cleats. I used 2 screws per board going from the mending block into the bottoms of the shelf boards. This way there are no screw heads visible from the top. Be careful not to run the screw too far into the mending block; we dont want screw tips coming through the tops of our shelves (the variable slip drill chuck will help here).
OK do we have a mending block under the shelves and counter, 1/2 between the legs at every location? OK good. Time to attach the front rails
Add the Front Rails
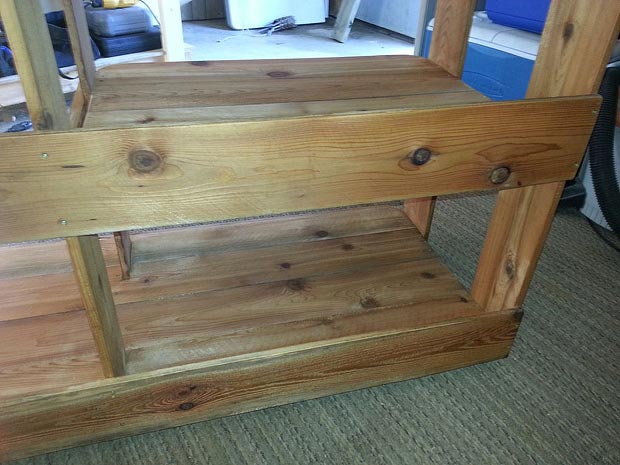
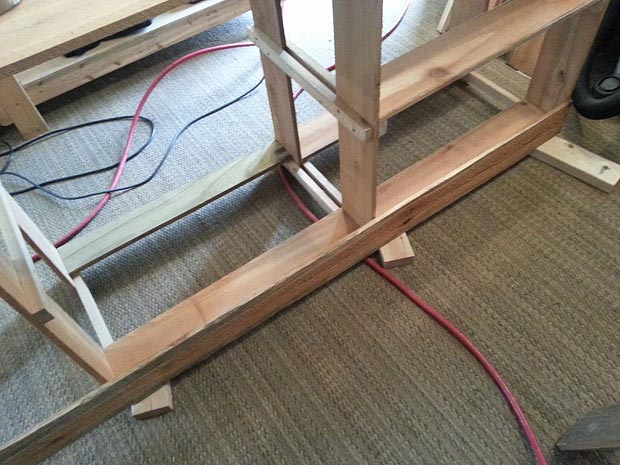
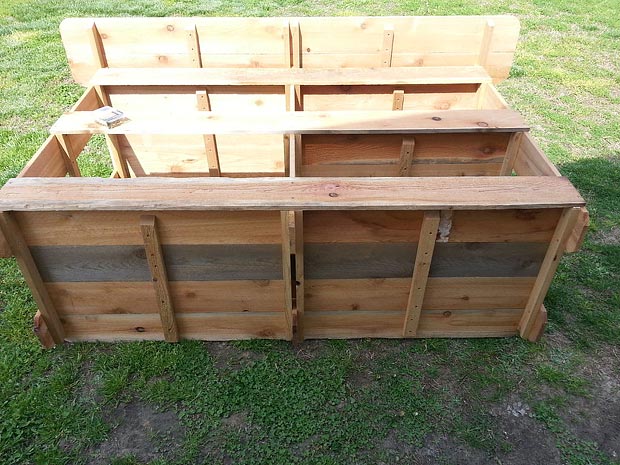
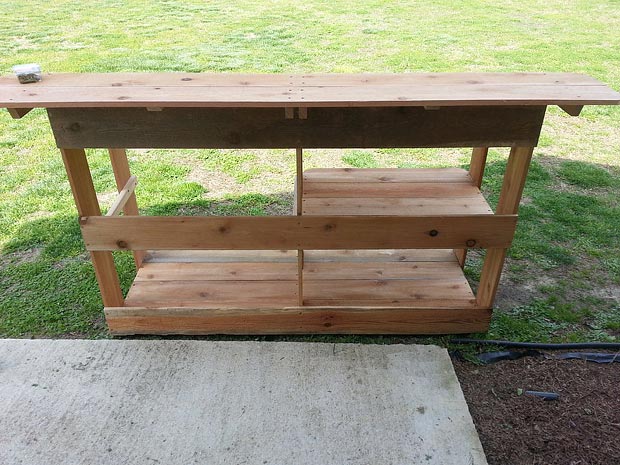
The bar front rails serve a few purposes:
1) They serve as backsplashes to the shelves and counter
2) They hide the cleats and shelves when viewed from the bar front
3) (and the most important) They keep the bar / counter from racking.
What is racking? Racking is when something that should maintain a square shape shifts out of square to form a parallelogram. IE the corners are no longer 90 degrees
So by making sure the bar is square and attaching the 3 rails with 2 to 3 screws per leg per rail it will help prevent racking. An “X” is the ideal brace to prevent this but we can do it with straight members. But if you choose, the center rail could be replaced with two rails in the shape of an X from the bottom of the top rail to the top of the bottom rail. Another thought would be to buy enough pickets to completely cover the front and sides of the bar so it is enclosed if you prefer. Thats the beauty of building your own stuff….you can make it your own.
Lets make sure the bar is square. Lay the bar on the counter front so the bar front is to the sky. Pull a measurement from the top of the left bar leg to the bottom of the right leg. Now take the same measurement from the right top to the left bottom. Is this measurement the same? If not rack it slightly by pushing laterally on the top or bottom from one side toward the other side. Measure again and repeat until the measurements are close to the same (hard to get it perfect)
Ok now that the bar is square, lay a picket across the bar legs. Get the square end flush with the outside of one bar leg and the bottom of the picket in line with the bottom of all 4 cleats across that level. Then go to the opposite end and mark this picket on the outside of that bar leg. Now cut this piece and two more the same length (this is actually a good spot for the rougher pieces but remember the dog ear end is the waste end).
Ok now that the rails are cut line the bottom of each rail up with the bottom of each row of cleats (see pic). So one rail should cover the counter boards and their supports, one for the middle shelf and cleats, and one for the bottom shelf and cleats.
Once you have them laid out, install 2 or 3 screws in each rail at each spot they touch the front of a bar leg. The 2 or 3 screws is the key to this step. Putting at least 2 screws at each location prevents the bar from racking. If you only put one screw at the center of the rail at it would just serve as a pivot point and the bar could still rack.
Stand it back up and we are onto the final construction step!
Lets Install the Bar Top
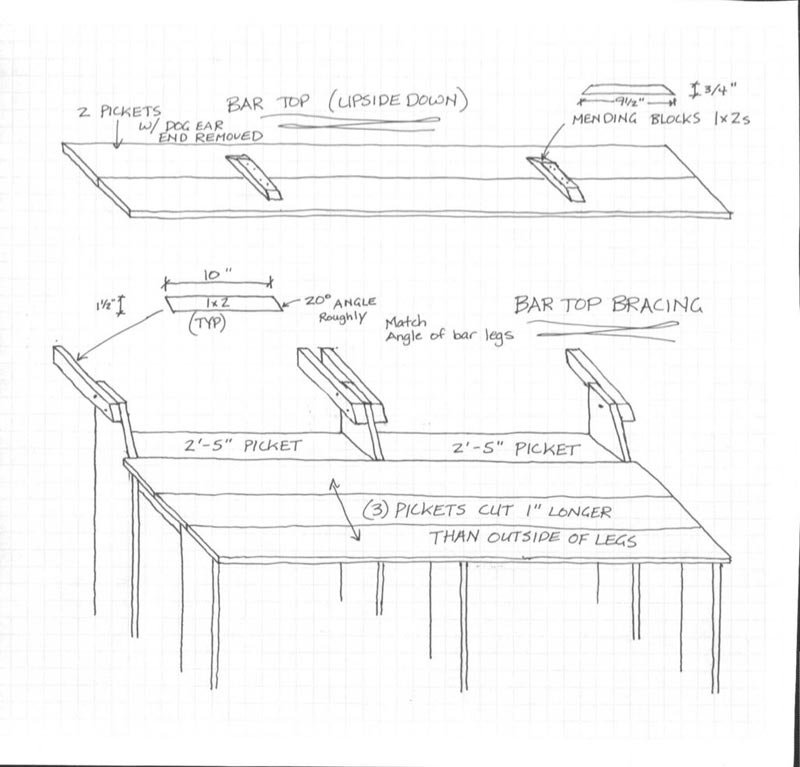
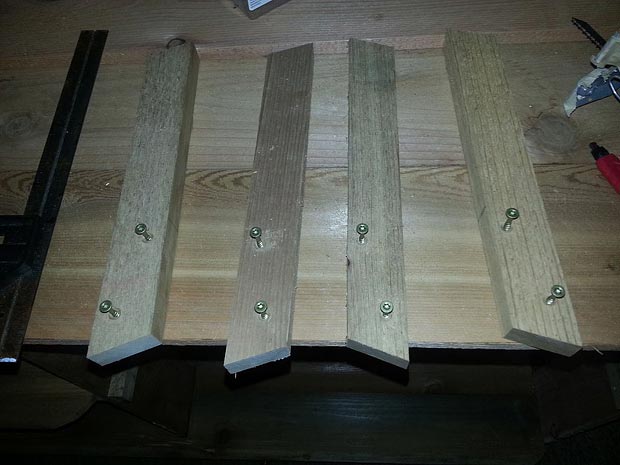
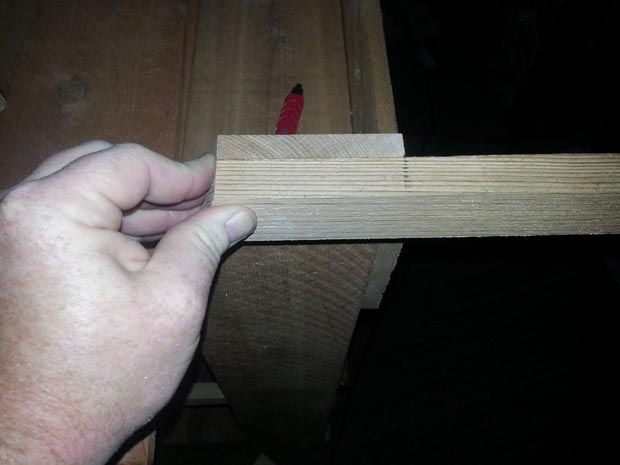
If you cut the angle in the top of your bar legs like I did read on, if you left them square just cut (4) 10″ 1x2s and skip to the next paragraph. Ok the first part of this step is a practice in patience. Essentially I kept cutting a 1×2 at different bevels until the top of the 1×2 (3/4″ side) matched the cut on top of the bar leg and the angle cut off the back of the bar leg matched the bevel I just cut. Once I got the bevel correct (which turned out to be about 20 degrees for me) I cut (4) 1×2 boards a little more than 12″ with the bevel on one end. Now line up the bevel ends and measure 10″ across the top and cut the same angle in the same direction across all 4 supports (see pic).
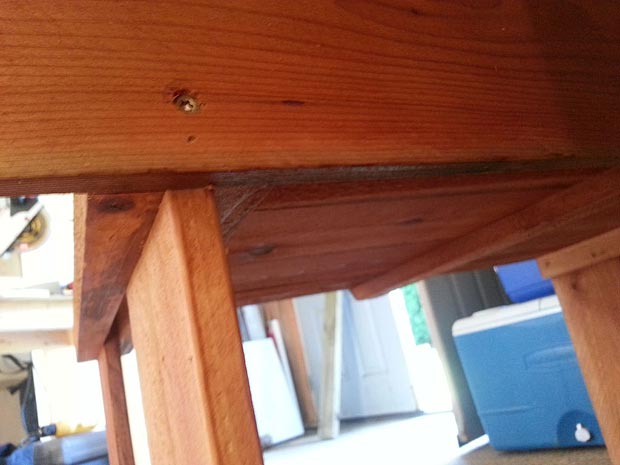
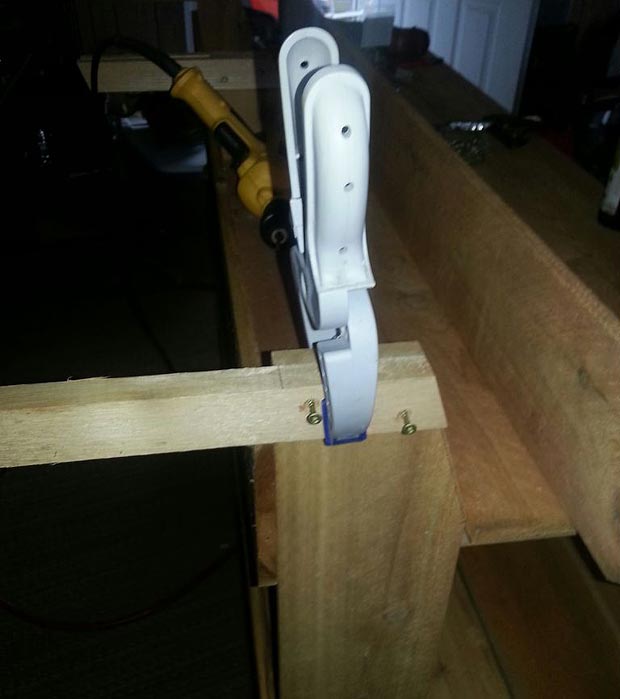
Now that we have 4 identical bar supports we need to attach them to the top of the bar legs. Notice in the picture of the 4 laying side by side, they are mirrored from the center out. The easiest way is to pre drilled the holes as shown in the pic and start all screws. Now line up the support with the top of the outside of the bar leg (this will be oriented with the wide side to the leg like the cleats). Now clamp the support to the top of the leg (see pic) now shift it until its perfectly aligned with the top and back edges of the bar leg. Are we good level and square? Then attach it. For the outside supports I then went back and ran a screw from the inside of the bar leg into the support so the end supports have 3 screws bracing them.
Now repeat this for the other end leg then for the 2 center supports.
Now the bar top itself. I cut just the dog ear off as shown in the picture then 1 more board the exact same length. Now cut 2 mending blocks like before except this time the long side of the 1×2 is 9 1/2″. Lay the two bar top pickets together even on the ends, and treat it the same way you did the counter top boards. Lay them next to each other and make sure they stay tight together the entire length and they are close to the same thickness. Once they are to your liking line up the ends of the bar top boards and eyeball 1/2 way between legs (same area as the shelf mending blocks) and attach the mending blocks as shown in the sketch (remember this is the bottom of the bar top if you want a particular side up make sure its not this side). I used 2 screws from the block into each bar top board.
OK are the 2 bar top boards now one? Now lay this unit across the bar top supports (mending blocks down) and make sure we have an even overhang on each end. Make sure the backside of the back bar top board is even with the backside of the bar legs and supports.
Everything even and good?
Now attach the top with 2 screws per board per support. (see pic) Now sit back have a beverage and admire your work. The construction is done! All that is left …. sanding and finishing.
Finishing Touches
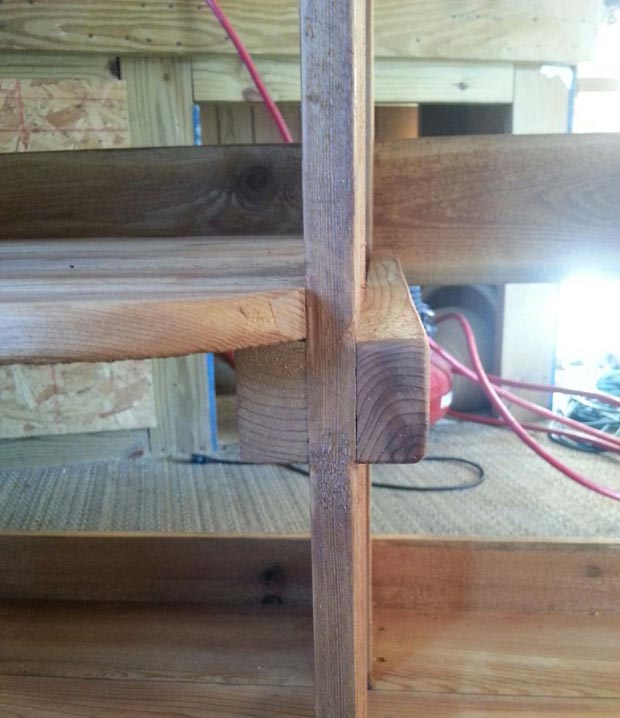
Congrats! We are done with our bars and can put them to use now. If you want to leave it natural and and let it weather to the cedar gray color. You are done! Everything beyond is optional. However sealer will help combat any wood warping that could occur.
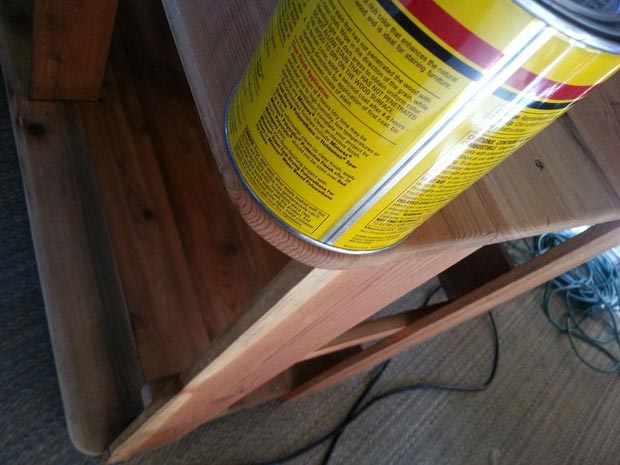
To round the exposed corners of the shelves, counter top and bar top I used a quart can to draw my radius. Lining up the can in the corner with the edges of the pickets gives you an easy radius to trace (see pic). Now go back and cut that radius with a jig saw running a scroll blade (scroll blades are narrow and allow a tight turn in materials).
Once I had all the corners rounded out with the jig saw, I went back and sanded the corners / edges of almost every board on this project. It didn’t take too long just knocking the edge off with 180 grit paper by hand. The main thing I used the random orbit sander for was the bar top and counter top. I used 80 grit to smooth out these two surfaces.
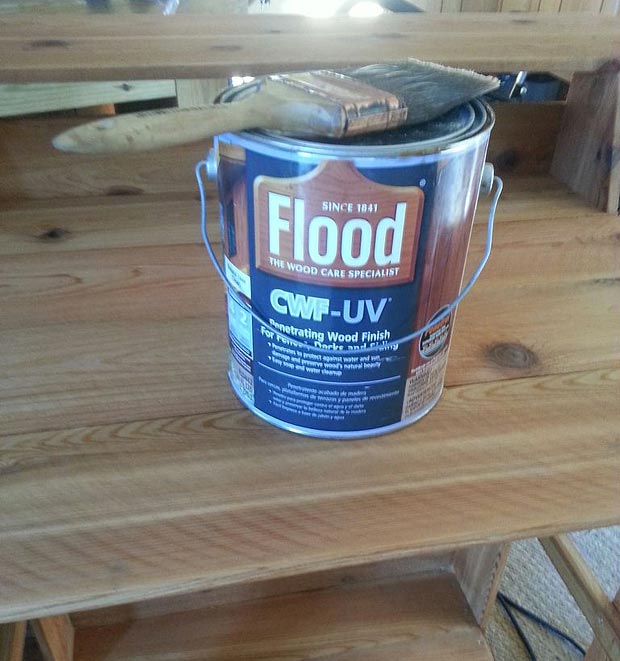
Now to stain or seal or leave it bare….??? What to do? If you want it to maintain the cedar color it is now you need to seal it with a sealer that has UV blockers in it. I’m finishing this “ible” a week after I finished the bar and I can tell you what I did. I like the Flood sealer it works great on my deck. I had some left over and figured I would give it a go on the bar. Now I knew Flood recommends the wood be slightly weathered and dry (new wood has moisture that must weather out of it) before applying. I figured “cedar that has been outside at Lowes for months should meet those requirements”. It almost did. A fair amount of sealer soaked in but it just felt damp after 3 days of drying. So I took it outside and sprayed it with water and it didn’t bead the water but foamed like rinsing a soapy residue off. So I sprayed the entire bar down and let it dry. So now I have a semi-sealed bar that I’m going to just let weather and see what happens. All else fails I’ll power wash it a year from now and apply some type of sealer.
UPDATE: Well a week after I rinsed the excess sealer off it is beading water like a champ. So maybe I just over applied the sealer. But if I were to do it over I would let the wood dry for a month or so, then seal.
As usual take this idea and make it your own. Let me know if there are any questions or details I missed.
Now we just need to get our patio poured so we can put this bar to use 🙂
Oh one last thing. The “tipsy” bar can be remedied by sitting a cooler full of beverages on the bottom shelf :). But if the cooler is empty I’m thinking about putting a few bricks on the bottom shelf to help prevent it from tipping. It doesn’t tip easy but if a kid were to grab the bar top front edge and try to do a pull up it could go badly so I’m going to put some weight on the bottom shelf.
The Sun is mean
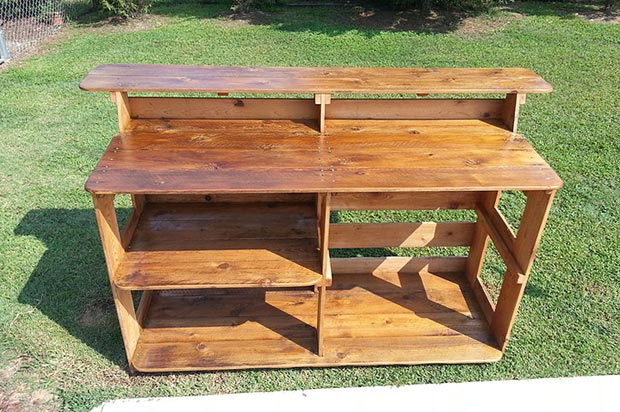
Well we are nearing the end of summer and I have made some changes to the bar. I added two more “rails” across the front to screen things stored on the shelves (still not inviting for spiders). And it looks more complete now.
I finally broke down and sanded all horizontal surfaces pretty smooth (the weather proofer/sealer didnt cut it). I left all the non horizontal surfaces the way they were but on the countertop, shelves, and bartop I went to it with some dark walnut minwax stain. I was careful to stain only those surfaces. So now I have two tones. Dark for the counter, bar and shelves, and lighter natural cedar for the legs and braces.
Once the stain dried for 2 days I came back and applied 4 coats of satin spar urethane the same way I did my kitchen island. Spar urethane is supposed to stay flexible and stand up to the outdoors …time will tell. But I ended up with an even more user friendly bar because it doesnt stain with BBQ sauce etc and I can wipe it clean with a clorox wipe 🙂



Leave a Reply